01 · INSTALLATION
Install on your Windows computer
- Open the official download page and choose Download trial installer.
- Open the downloaded installer. Choose Download and install in the small online installer. Keep the internet connected while it downloads the full setup. You can also choose Download full setup on the website.
- If Windows displays a security prompt, follow the guidance below after checking that this is the installer you downloaded from our official website.
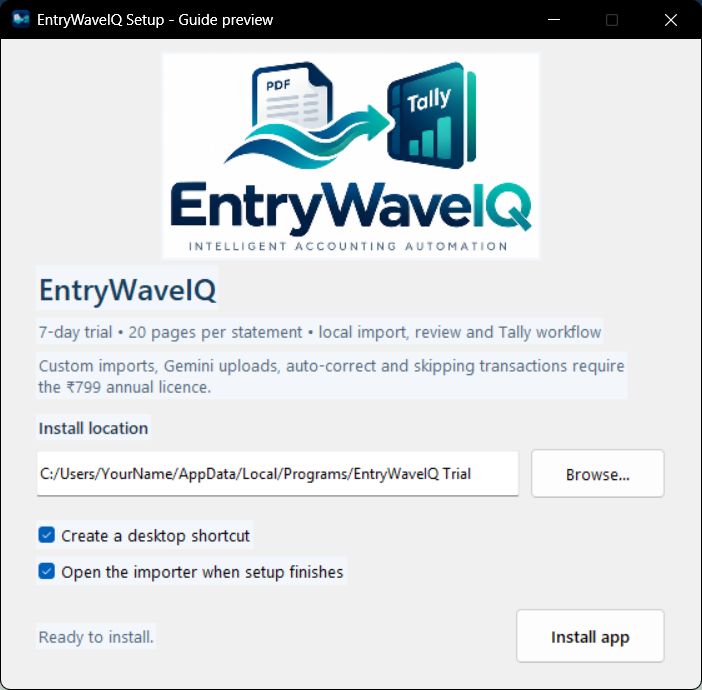
- In setup, keep the suggested installation folder or use Browse…. Choose whether to create a desktop shortcut and open the app when setup finishes.
- Click Install app and wait until setup completes. Close a running EntryWaveIQ window before updating an existing installation.
If Windows says “Windows protected your PC”
This installer is unsigned, so Windows may show an unrecognised-app prompt. If you trust this download, select More info, check the app name, then select Run anyway if that option is available. A separate permission prompt may then ask whether to allow the app to make changes.
Prompt illustration, not a screenshot. Windows wording and available options can differ. If Run anyway is unavailable or Windows reports a detected threat, stop and contact support or your administrator. Do not disable antivirus or Windows security to install the app.
 Open full size ↗
Open the app for the first time
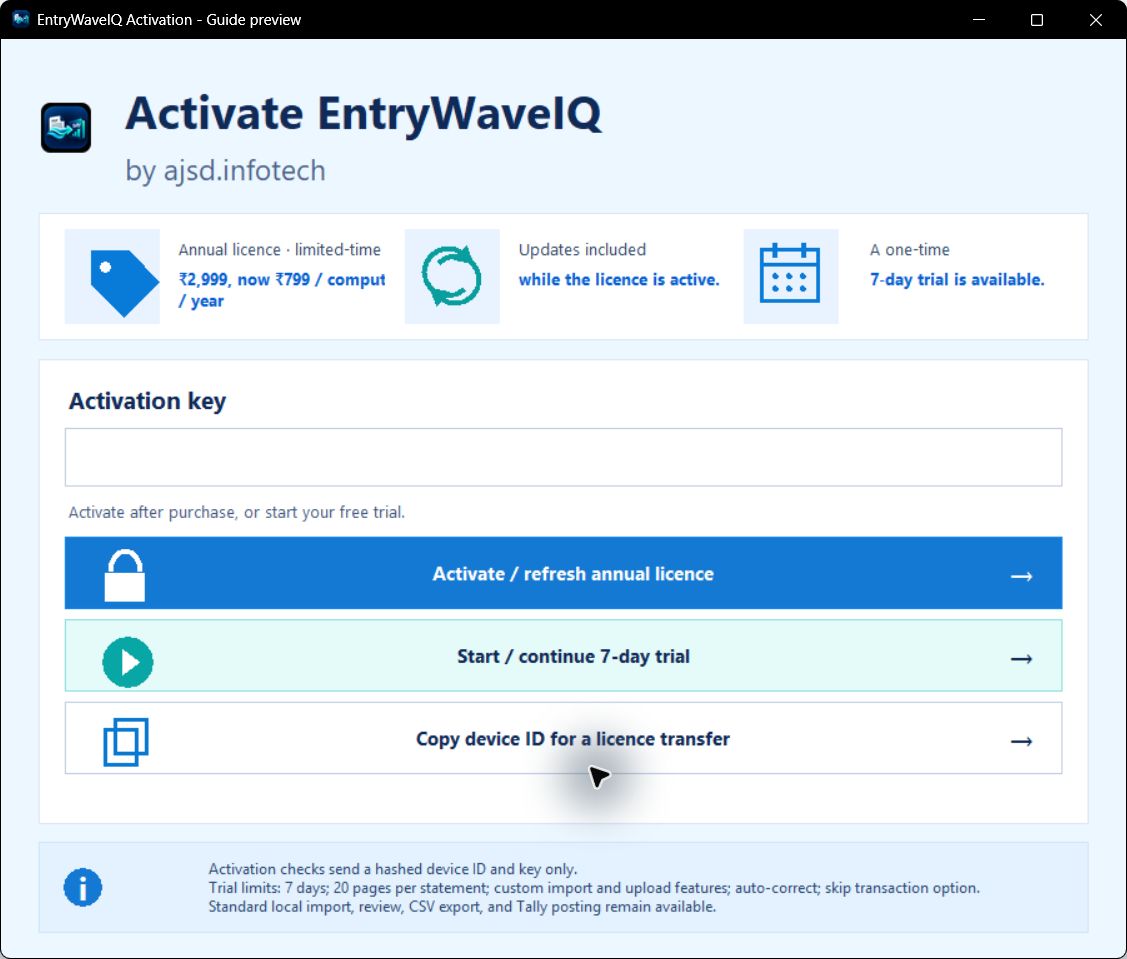
Choose Start / continue 7-day trial, or enter a purchased key and choose Activate / refresh annual licence. Trial validation needs internet access. A verified active annual licence normally opens directly into the workspace.
 Open full size ↗
02 · TALLY SETUP
Connect Tally on port 9000
Run TallyPrime and EntryWaveIQ on the same Windows computer. Keep the intended company loaded in Tally.
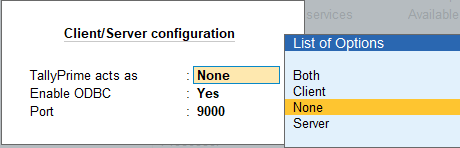
- In TallyPrime, open F1 (Help) → Settings → Connectivity → Client/Server Configuration. Some releases expose this through Alt+Z (Exchange) → Configure → Client/Server Configuration or Data Synchronisation.
- Set TallyPrime acts as to Both (Client & Server).
- Set the Port to 9000. Save the configuration, usually with Ctrl+A. Restart Tally if prompted.
- Load the correct company and check its current financial-year period.
- Return to EntryWaveIQ and click Connect Tally. Select the intended company if more than one is returned. Use Load ledgers to refresh ledger names and parent groups.
 Open full size ↗
For version-specific menu details, see Tally’s connectivity instructions. EntryWaveIQ communicates with the local Tally XML service. ODBC is not required for this connection.
Transactions outside the open Tally financial year are excluded from sending and remain in the review sheet. If the app cannot confirm the year, it asks you to select the exact FY open in Tally. For example, 2025–2026 means 01-04-2025 through 31-03-2026. The app does not extend Tally’s financial-year limit.
03 · IMPORT
Open a bank statement PDF
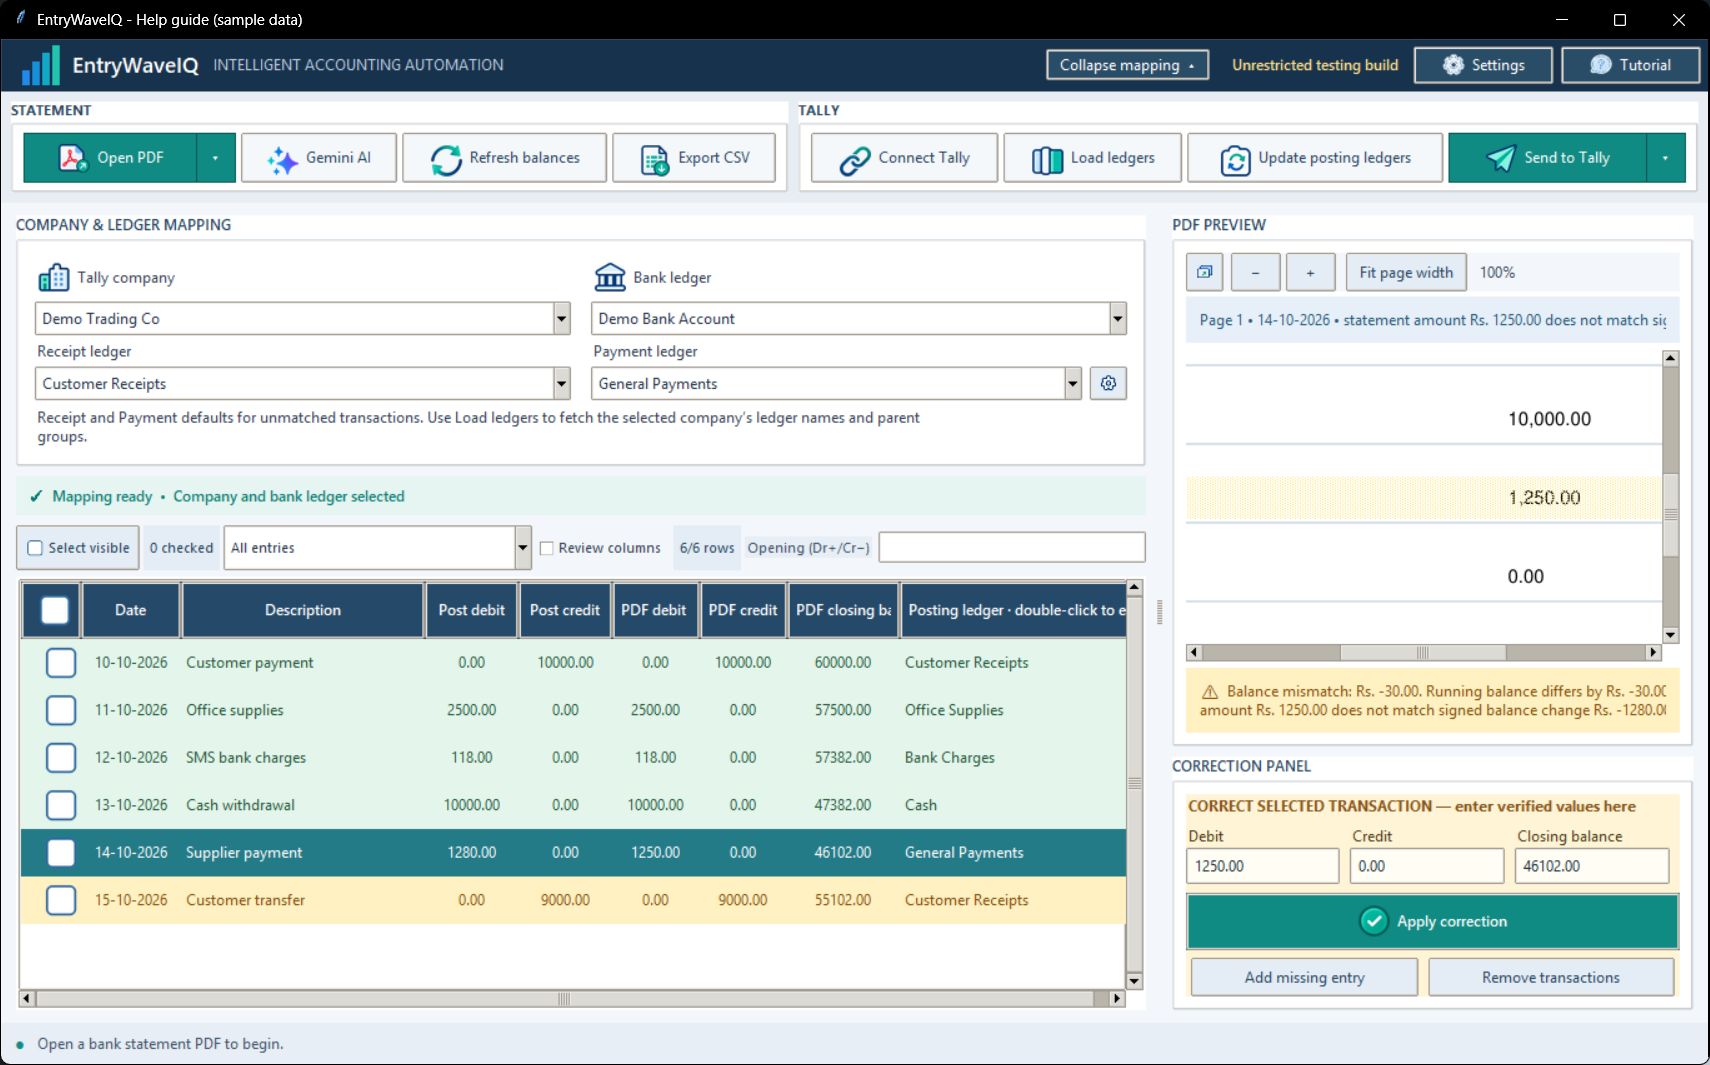
- Click Open PDF and select your bank statement.
- Wait for extraction to finish. Standard local extraction is the recommended starting point.
- Check that the first and last transaction dates, page coverage and number of rows look right.
- Check the detected opening balance. If it is missing or incorrect, enter the verified amount in the Opening (Dr + / Cr −) field.
 Open full size ↗
An original text-based bank PDF usually gives better results than a photograph or scan. Check that every statement page is present, upright and legible. A scan-quality notice appears when more than 20% of extracted transactions are unusable. Review the rows against the source; extraction cannot recover pages absent from the PDF.
The trial accepts up to 20 pages per statement import. Page-range import, text-only import and manual column mapping are Premium options in the arrow menu beside Open PDF.
04 · LEDGER MAPPING
Choose where each entry belongs
Open full size ↗- Tally company
- The company that will receive vouchers. Check this before each statement.
- Bank ledger
- The bank account for this statement. Only ledgers in Bank Accounts, Bank OD A/c or Bank OCC A/c are offered.
- Receipt ledger
- The default counter-ledger for unmatched money received into the bank.
- Payment ledger
- The default counter-ledger for unmatched money paid out of the bank.
- Posting ledger
- The counter-ledger for an individual row. Double-click the cell, type part of a name, then choose the intended ledger. Check suggestions before accepting them.
After changing ledgers in Tally, use Load ledgers again. Update posting ledgers refreshes automatic suggestions using the loaded ledger list; manual choices are preserved.
Bank charges and cash entries
- Bank charges: use an existing Bank Charges ledger or choose your own expense ledger for a marked charge. Choosing a ledger for one marked bank-charge row applies it to all marked charges in the current statement. Check those rows afterward.
- Select ledger: this means no safe posting ledger has been assigned. Read the review reason and select the correct ledger rather than leaving it unresolved.
- Cash / Contra: use the gear beside Payment ledger to open Advanced settings. Enable Contra vouchers and set the cash minimum as appropriate. Review cash handling fees separately from actual deposits or withdrawals.
Other bank, OD and OCC accounts are protected from being selected as ordinary counterparties. Always confirm that you chose the correct statement bank.
05 · TRANSACTION REVIEW
Check the numbers before sending
- Select a row. The PDF Preview shows its source page and highlights the transaction when its position is known.
- Compare the date, description, PDF debit, PDF credit and closing balance with the original statement. Also check the posting ledger.
- Use the filter to show Needs review, receipts, payments, Contra, usable or unusable transactions. A review row explains the issue beside the preview; enable Review columns for extra detail.
- Use +, − or Ctrl + mouse wheel to zoom. Scroll across the page as needed. The icon at the top-left of PDF Preview opens it in a separate window.
- Review running-balance differences, the opening anchor and month-end checks. A zero balance gap does not confirm that the date, ledger or description is correct.
Green: no current review issue detected; still check the source.
Yellow: needs attention or verification. Read the reason.
Red/pink: unusable data or an extraction problem needs attention.
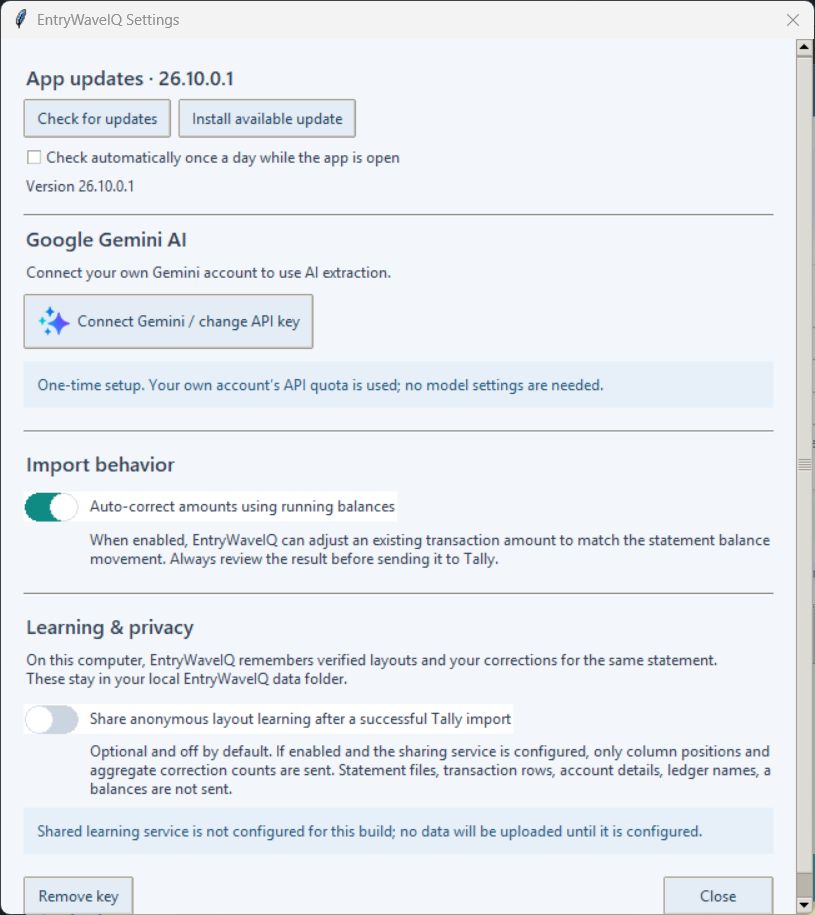
PDF debit / PDF credit are the statement amounts. Post debit / Post credit are the proposed posting amounts. Premium Auto-correct can use running-balance movement to change a proposed amount, so inspect any difference before sending.
06 · CORRECTIONS
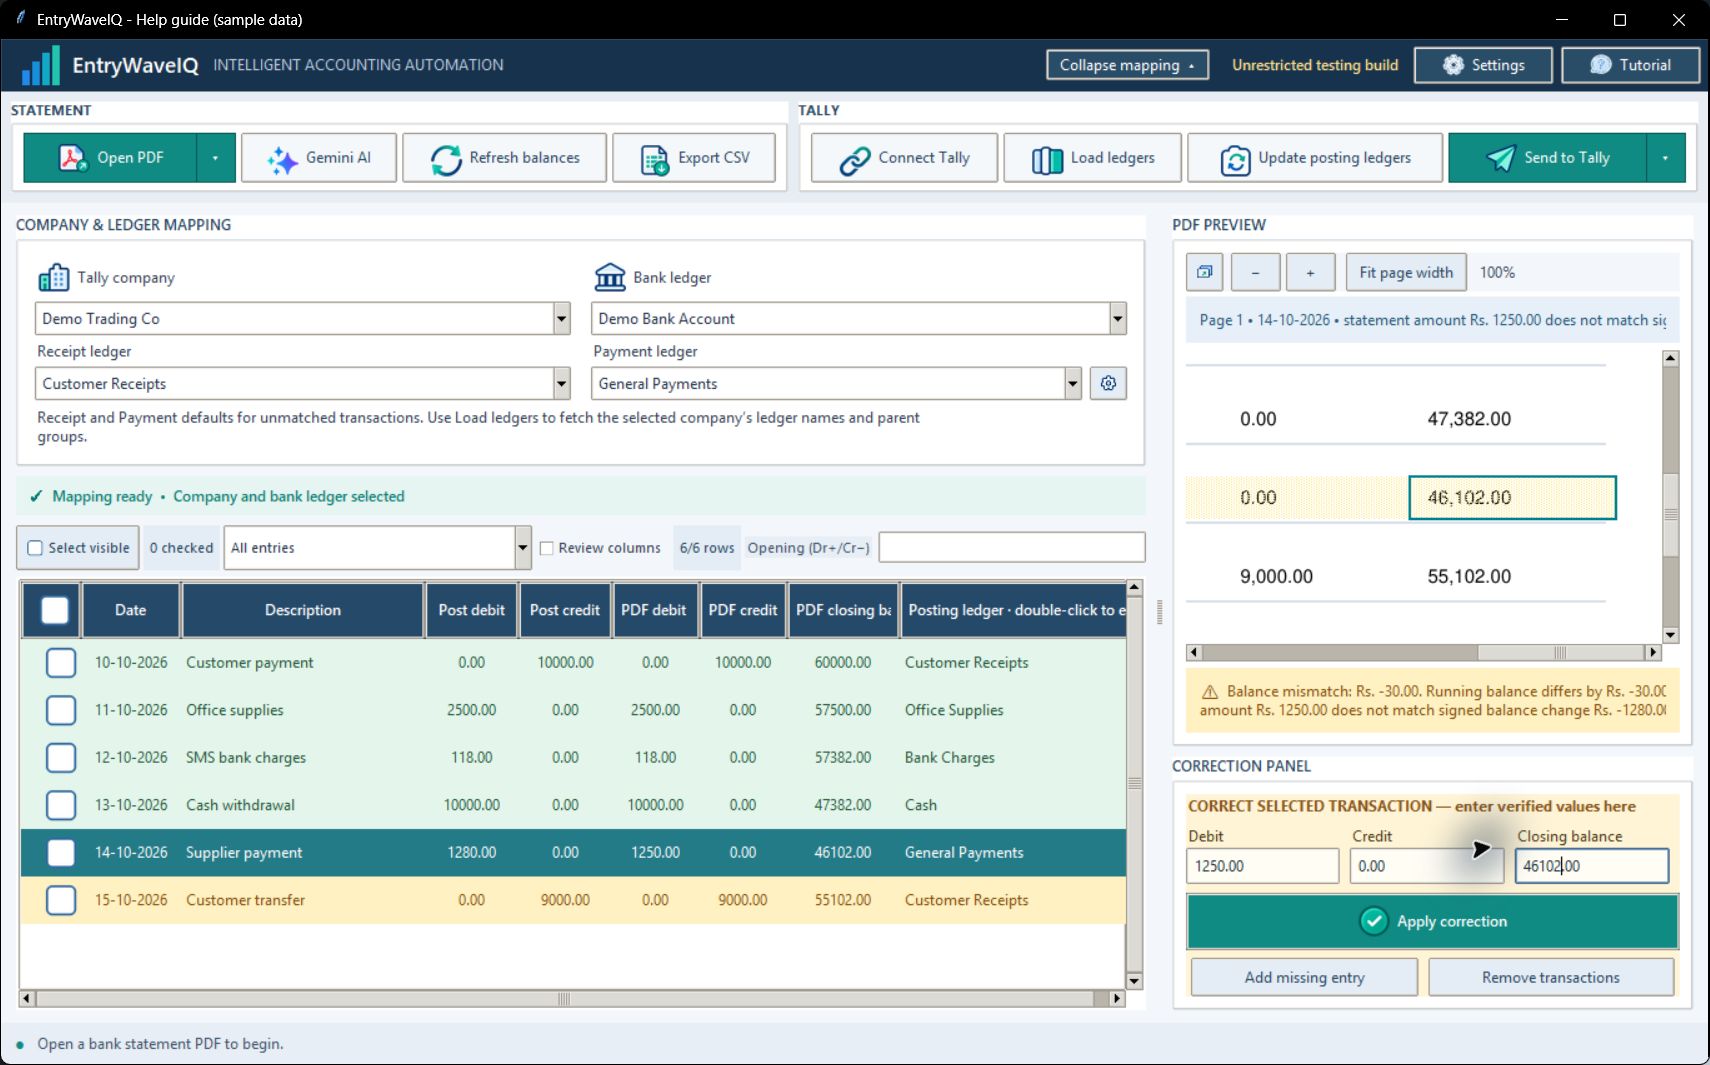
Correct a selected transaction
 Open full size ↗
- Select the transaction row.
- Read the original figures in PDF Preview.
- Enter the verified values under Debit, Credit and Closing balance in the Correction panel. Normally one amount side is populated; follow the statement.
- Click Apply correction. Recheck the row and the following running balance.
Use Tab and Shift+Tab to move between fields. At your chosen zoom, the preview scrolls to the associated column when its position is known. If no column location is available, it keeps the transaction line in view.
Edit dates and ledgers
Double-click the Date or Posting ledger cell. Dates use DD-MM-YYYY; dots, slashes and backslashes are accepted too, such as 15.10.2026, 15/10/2026 or 15\10\2026. Press Enter to commit the edit.
Missing or extra entries
Select a row and choose Add missing entry before selected to enter a transaction verified in the PDF. To remove extras, check the rows and choose Remove transactions. With no checked rows, the selected row is used. Read the confirmation, especially if checked rows are hidden by a filter.
Load the original extraction again
In Advanced settings, turn off Remember previous settings and changes before reopening the PDF. The next import ignores saved edits, deletions and learned layouts. Keep it on when you want to resume previous corrections. Existing views are not reset merely by switching it off.
07 · EXPORT
Export a review or send to Tally
Save a CSV
Click Export CSV, choose a location and save the review data. This does not create Tally vouchers. Keep a copy if you need to document your review.
Create vouchers in Tally
- Keep Tally open on the intended company and financial year. Refresh ledgers if they changed.
- Resolve missing dates, unclear amounts and unassigned ledgers. Verify AI/comparison rows against the PDF where required.
- Click Send to Tally. For a limited period, use its arrow menu and choose the date-range option. Enter inclusive dates in DD-MM-YYYY format.
- Read the confirmation: company, voucher count, default ledgers and any proposed corrections. Confirm only when the figures and ledgers are right.
- Wait for the Tally response. Check Created, Errors and other counters, then verify the entries in Tally.
Send to Tally sends the eligible review rows, subject to the selected date range and financial-year restriction. Checking a few rows is not a “send checked rows only” selection.
If the connection times out after sending starts, check Tally before retrying: it may already have imported some entries. Re-sending can create duplicates. The opening balance is a review anchor and is not sent as a separate voucher.
08 · OPTIONAL PREMIUM FEATURES
Gemini and extraction comparison
Try local extraction first. Gemini uploads require Premium, your own Gemini API key, and the confirmations shown in the app. Your account’s API quota and any provider charges apply.
 Open full size ↗
- Open Settings → Connect Gemini / change API key and follow the account/key instructions. The app saves your key encrypted for your Windows profile.
- Choose Gemini AI, select the PDF and review the sharing/billing information before continuing.
- Watch the progress stages: preparing, sending, waiting for Gemini, receiving and checking the result. Larger or scanned files and provider delays can take longer.
- Use Cancel Gemini upload to stop the app’s request. Cancellation cannot retract information already sent to the provider.
- Review returned rows against the PDF before posting.
In Advanced settings, Compare local + Gemini extraction compares fresh local extraction with page-by-page Gemini results. Review page/month coverage, disagreements and repeated-entry candidates before loading a combined result. It does not compare against vouchers already in Tally.
09 · ACCESS
One app for trial and Premium
The trial has only these restrictions:
- 7-day trial.
- Maximum 20 pages per bank statement import.
- Custom import and upload features locked, including page-range, text-only import, manual column mapping and Gemini uploads.
- Auto-correct locked.
- Skip transaction option locked.
Standard local import, manual review/corrections, CSV export and Tally posting remain available during the trial. Activate an annual licence in the same app to unlock Premium features.
Open Settings for licence days, device ID and activation/renewal actions. A verified active annual licence normally skips the activation screen and displays a Premium badge. Updates are included while the annual licence is active. Reinstalling does not restart a trial.
10 · MAINTENANCE
Update or uninstall
In Settings, choose Check for updates, then Install available update when one is offered. You can allow periodic checks; installation still requires your action. Finish any import or posting operation and save your work first.
You can also download the latest setup from this website. Close EntryWaveIQ before installing. Keep the suggested existing installation folder unless you intend to change it.
To uninstall, open Windows Settings → Apps → Installed apps, find EntryWaveIQ Trial and choose Uninstall. Local customer settings and reviews are preserved by the app’s uninstaller.
11 · QUICK FIXES
When something needs attention
Tally is not found or ledgers do not load
Check that TallyPrime is running on the same computer, the company is loaded, Client/Server is Both and port is 9000. Save the configuration and restart Tally if requested. Click Connect Tally again, select the correct company, then Load ledgers. A changed company needs its own refreshed ledger list.
Posting ledger says “Select ledger”
The app could not assign a safe ledger. Read the review reason, load the company’s ledgers and choose a classified non-bank posting ledger. Check Receipt and Payment defaults too.
A cash handling fee is being treated as a cash transfer
Check the narration, amount, cash minimum and ledger. A handling fee belongs to the appropriate expense ledger, while an actual cash withdrawal/deposit may use Cash with Contra enabled. Small amounts should not be assumed to be cash transfers.
Rows or months appear to be missing
Check the actual PDF’s page count and dates first. Reopen with remembered changes off if earlier deletions or edits are hiding rows. Review extraction against every page; Premium comparison can help compare local and Gemini results. Neither extractor can recreate pages missing from the source.
A transaction is marked Needs review
Select it and read the reason beneath PDF Preview, or enable Review columns. Common reasons include date errors, missing or two-sided amounts, a balance gap, missing month-end data, an unassigned ledger, a cash-rule conflict or unverified AI/comparison output.
Setup reports “Permission denied”
Close the running app and try setup again. If it remains open, save your work and close it from Task Manager, then retry. On a managed computer, ask your administrator if installation is blocked.
Setup reports a missing payload or incomplete file
Download a fresh installer from the official website. Keep the download complete and launch setup normally; do not run an extracted partial package. Contact support if the error repeats.
Gemini is slow or times out
Cancel the request if necessary, check your connection/account quota and try a smaller eligible selection. Prefer a readable text-based PDF or local extraction where possible. Verify any returned rows before posting.
How do I get support?
Visit Contact & support. Include the app version, steps that caused the issue and the error text. Use sample or redacted screenshots; keep bank details, API keys and activation keys private.